A Field Manual For Oscillators

What You'll Learn
Oscillators are the basic building blocks of video synthesis in Lumen. In this tutorial you’ll learn:
- What an oscillator is and why Lumen has three of them
- Which frequencies can be used to create which types of visual patterns
- How the sync and frequency controls interact with each other
- How to use the waveshaper and colorizer to fine-tune your patterns
If you’re having trouble finding your way around Lumen’s interface, please check out the Quick Start guide before continuing here.
What is an Oscillator?
Fundamentally, oscillators create a signal that goes up and down at a regular intervals. This is the same way that oscillators work in audio synths, so if you’ve used those before, you’re off to a great start with video synthesis!
If you looked at the value of this signal over time, you’d see it create a wave:
There are a few common types of waves that you might see oscillators create:
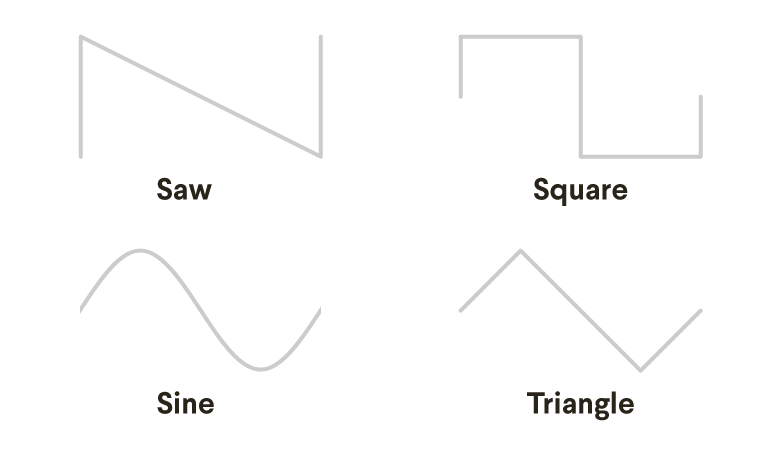
By the end of this guide, you’ll be able to create video patterns using Sine, Saw, and Triangle wave shapes! But first, we need to cover some video synth basics.
Video from Oscillators
Analog video synthesis is all about treating the electrical signal that transmits analog video as something that can be shaped and played with. This way of thinking connects every analog video synth, from Dan Sandin’s original Image Processor (built way back in 1969!), to modern hardware synthesizers and modern software video synths like Lumen.
So how does it work? Well, it turns out that when you take the repeating pattern of electrical signals generated by an oscillator and feed it into an old CRT TV (with a lot of technical fiddling that you won’t have to worry about in Lumen), you can make moving shapes and patterns appear. This is all because of the way the TV’s electron beam moves across the screen during a frame:
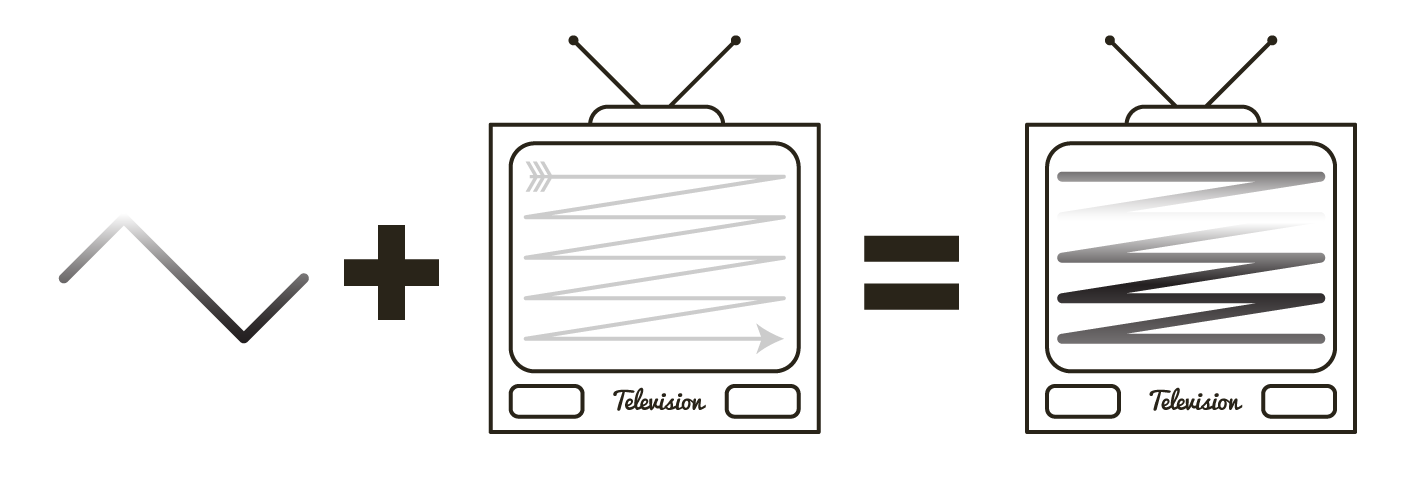
The simplified version is that when the analog video signal is higher, it creates a bright spot on the TV screen, and when it is lower it creates a darker spot. But where that bright or dark spot appears on screen depends on where the electron beam is at that exact moment. So the movement of the electron beam and the rising and falling of the video signal end up working together to paint a video image in real-time.
Don’t worry, though - you don’t have to understand any of the technical details to make some cool art with video synths! The key things to know are:
- Lumen’s oscillators create a simulated analog video signal that is displayed on a simulated analog TV screen, and
- This interaction between signal and screen is what gives different oscillator frequencies and wave shapes their own looks
So you’ve got in front of you this video instrument - one that shares the same philosophy as the tools used by the great video artists of the 70s and 80s - let’s make something cool with it, shall we?
Signal Flow in Lumen
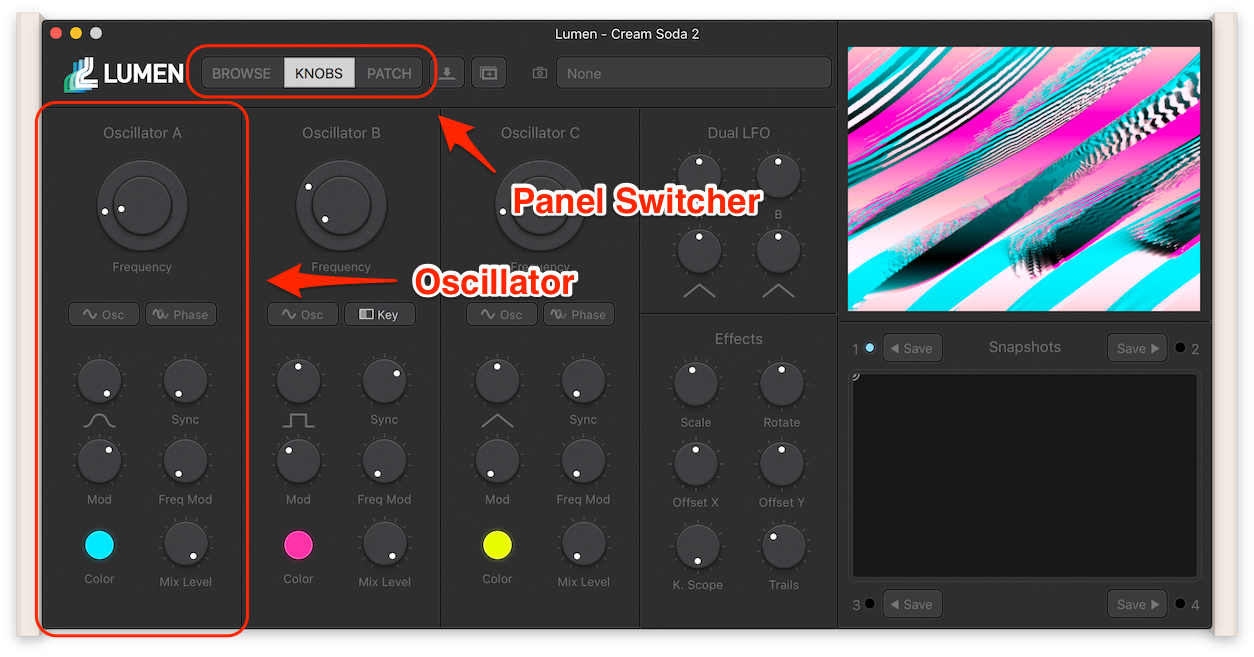
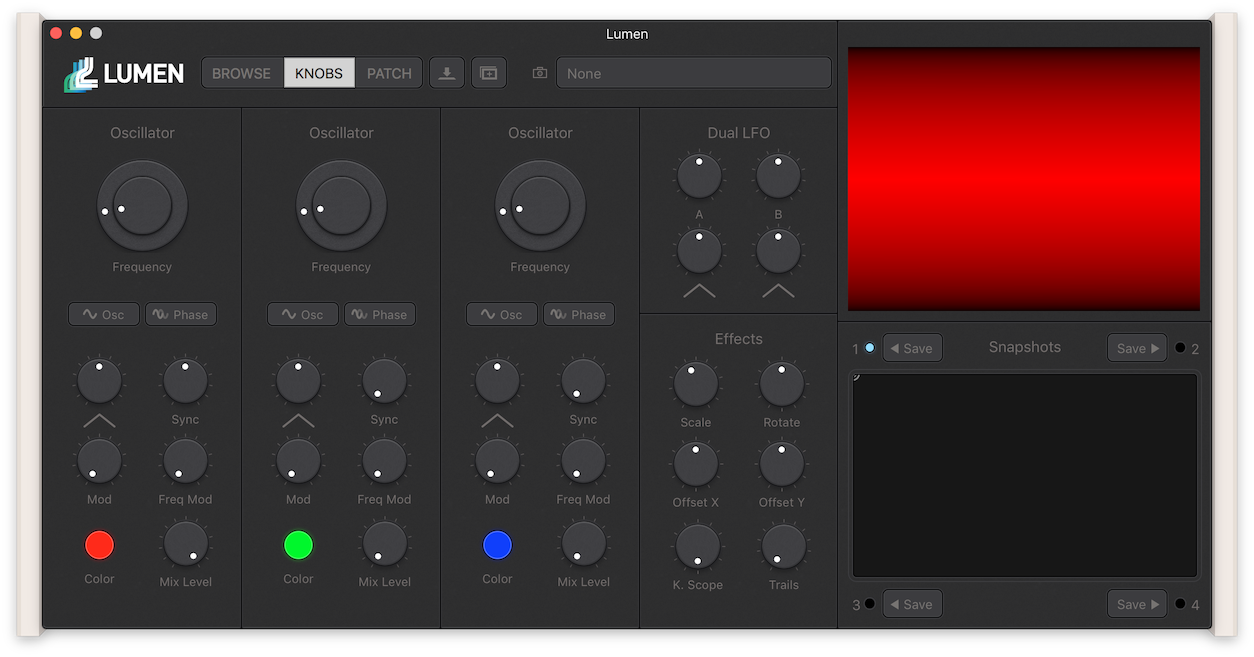
First, switch over to the Knobs Panel to check out Lumen’s three identical Oscillators:
Lumen is what you’d call a Semi-Modular Synthesizer. This means that:
- It is made of smaller parts called Submodules, such as Oscillators and Effects, that each generate or process video signals
- Each of these submodules are pre-wired to each other in a particular order
- We can change the order that these submodules process video in
For now, we’ll only be talking about what happens when you haven’t made any changes on the Patch Panel yet, so the submodules are all connected to each other in their usual order. We call this scenario the Default Patch.
Let’s reset Lumen to the Default Patch now by pressing the Command+N keyboard shortcut, or selecting File -> New from the Application menu.
Here’s a simplified view of how the submodules inside Lumen are hooked up to each other in the Default Patch:

Not too complicated, right? All three Oscillators (A, B, and C) are mixed together in the Mixer, then sent through the Effects to the Output.
Making Patterns with Frequencies
Only Showing One Oscillator
To make it easier to see how the Oscillators work, let’s turn down the mix levels such that only the output of the first Oscillator (“Oscillator A”) is visible:
- If you haven’t reset to the default patch yet, do that now (
Command+Nor File -> New) - Find the 2nd and 3rd oscillators from the left (“Oscillator B” and “Oscilllator C”) and turn down the
Mix Levelon each of them:

Lumen has three oscillators, each corresponding to a default color of red, green, and blue. Because we turned down the levels on the green and blue oscillators, you should now only be seeing the output from the red one, Oscillator A:
Now that we’re only showing Oscillator A, let’s start exploring it.
Setting Oscillator Frequency
The number of times per second that an oscillator’s pattern repeats is called its frequency.
Frequencies are measured in Hertz (abbreviated Hz). So if an oscillator has a frequency of 1Hz, that means its signal will repeat exactly once per second. 50Hz means it will repeat 50 times a second.
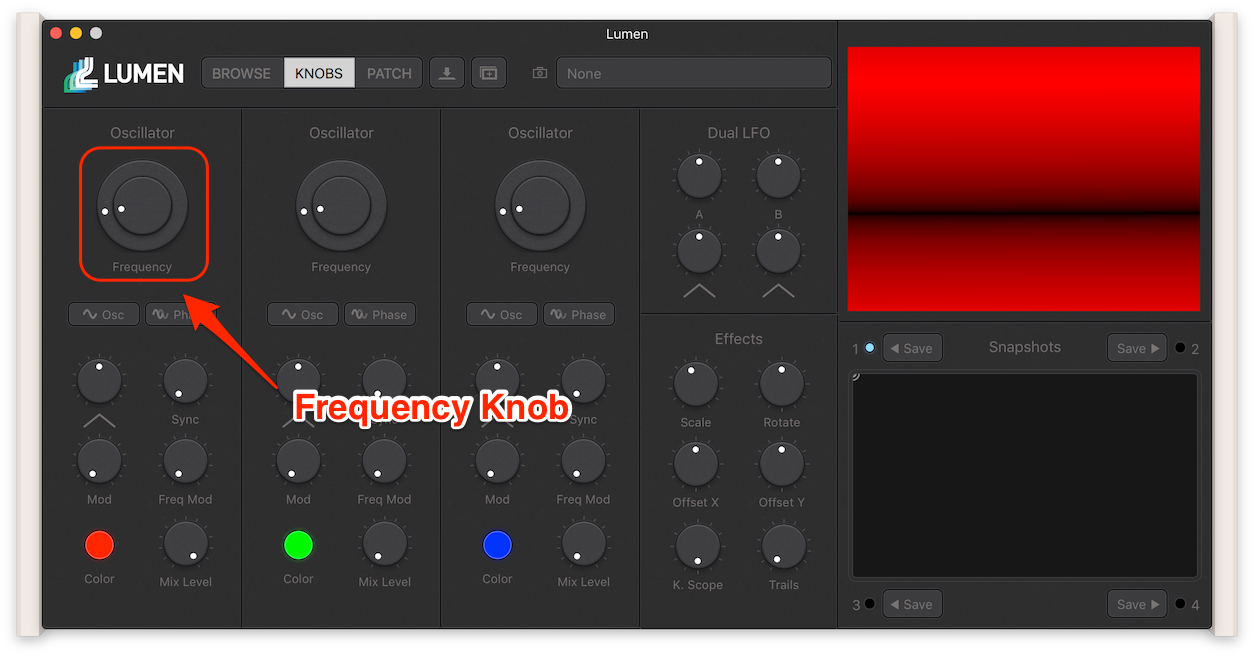
The big knob labeled Frequency at the top is used to adjust the frequncy of each Oscillator. These oscillators can go from once every 8 seconds to 1.92 billion times a second!
Pro Tip The Frequency knob is actually two knobs on top of each other. The outer knob is a “Coarse” control that will let you quickly scan through the entire frequency range, and the inside knob is “Fine” control that can be turned all the way around more than once.
If you were to drag through the entire frequency range, up and down again, you’d see something like this:

Whoa. Let’s break that down - feel free to follow along in Lumen.
Frequency Ranges
Because of the relationship between the oscillator’s signal and your computers’ screen refresh rate (60Hz), you can reliably spot certain types of patterns when you use oscillators at certain frequency ranges:
0.125Hz - Once you get below about 10Hz, all you’ll see is flashing colors:

59.88Hz - Above 10Hz, we’ll see scrolling lines. If you want to make one that is slow and about the same height as the screen, get near 60Hz. In fact, any time you’d like your lines to move slowly or be even divisions of the screen height, set your oscillator’s frequency to a multiple of 60Hz (like 120Hz or 180Hz).

480.8Hz - As you increase the frequency, the number of lines increases:
28.74kHz - Above 6kHz, the lines start getting really tiny and then you start seeing diagonal lines!
880kHz - In the very high frequency range, you can see crazy noise-like patterns:

Wow, that’s already a lot of power and that’s only one knob!
Everything we’ve done so far with oscillators has involved creating moving patterns - surely we can make static ones too, right? Let’s explore how to tame these wild oscillations with Sync.
Slowing Things Down With Sync
The sync knob is one of the controls you’ll use the most in Lumen. It allows you to change the speed and direction of the scrolling lines in the patterns above. There are three Sync settings available from this knob at the following positions:
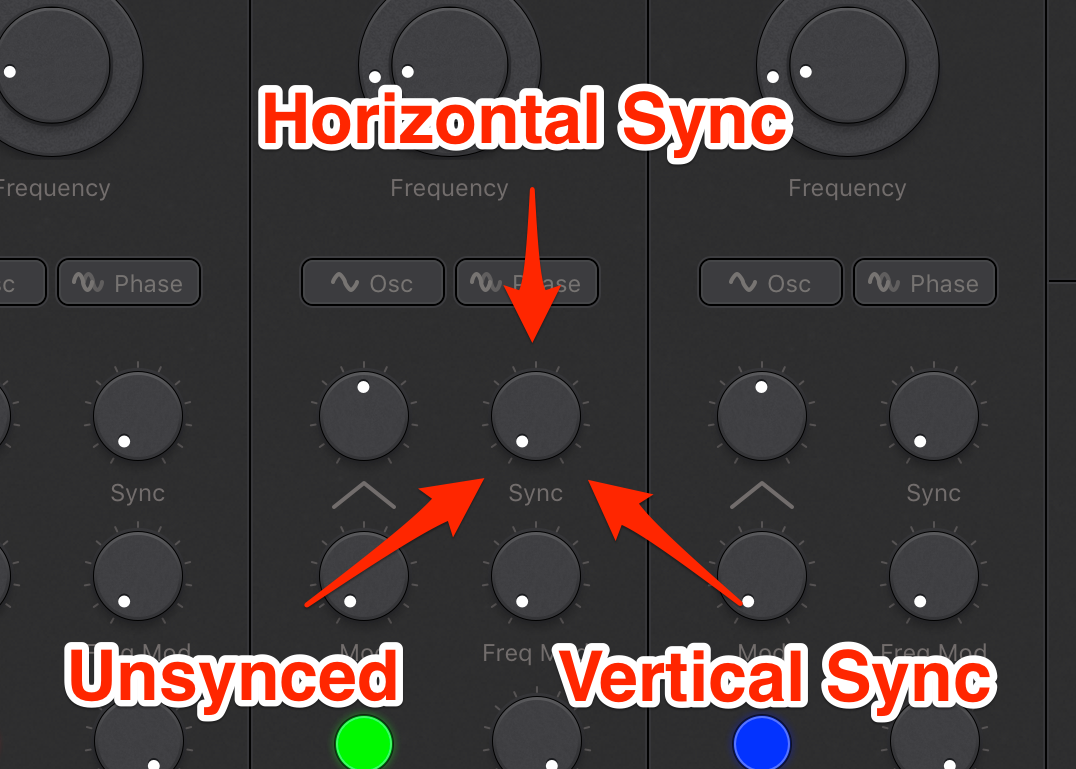
- Unsynced (fully counterclockwise): This is what we’ve used so far. The oscillator runs free, creating moving lines.
- Horizontal Sync (halfway turned): This resets the phase of the oscillator every frame, creating a still lines.
- Vertical Sync (fully clockwise): This resets the phase of the oscillator every horizontal line, which creates still vertical lines!
Pro Tip When turning the Sync knob, you might notice a “notch” at the Horizontal Sync setting. This is often convenient, but if you’d rather have a smooth transition through the notch, you can hold down the
Controlkey while twisting the knob to avoid it.
Science Time The patterns created by video oscillators move over time because the oscillator’s frequency does not exactly match the refresh rate of the screen. Because of this, the phase of the video signal is different at the end of each frame, making the lines begin in different places each frame - which makes the lines look like they’re “moving.” If we were to keep the oscillator’s phase from changing by resetting it every frame, the image would hold still - which is exactly what Horizontal Sync does.
Sync Extras
The three Sync options we mention above, offered traditionally on hardware video oscillators, are all you need to create intricate video patterns. With Lumen, though, we saw an opportunity to push things a little further by making the selection continuous instead of discrete. If you twist the knob all the way from left to right, you’ll see that:
- Between Unsynced and Horizontal Sync, the motion of the lines slows down. We do this by modifying the oscillator’s frequency to be closer to the nearest multiple of the frame rate (60Hz). The closer the knob gets to the Horizontal Sync setting, the closer the frequency gets to a multiple, which makes lines move more slowly.
- Between Horizontal and Vertical Sync, the lines are rotated. This is a little cheat on our part to make life easier for you - this would not happen in a hardware synth. Handy, though!
Tech Note In hardware video oscillators, to get the same width of lines while vertically synced as you’d see when horizontally synced, you’d have to multiply the oscillator’s frequency by a special value related to the frame rate and screen aspect ratio. Don’t worry, though, we do this for you automatically! All you have to do is turn the Sync knob to the right to get vertical lines.
Wave Shaper and Colorizer
Wave Shaper
We mentioned above a handful of waves that you might find oscillators generating:
Lumen’s Oscillators can generate all of these types of waves – you can change which wave type an oscillator generates just by turning the Wave Shape Knob:
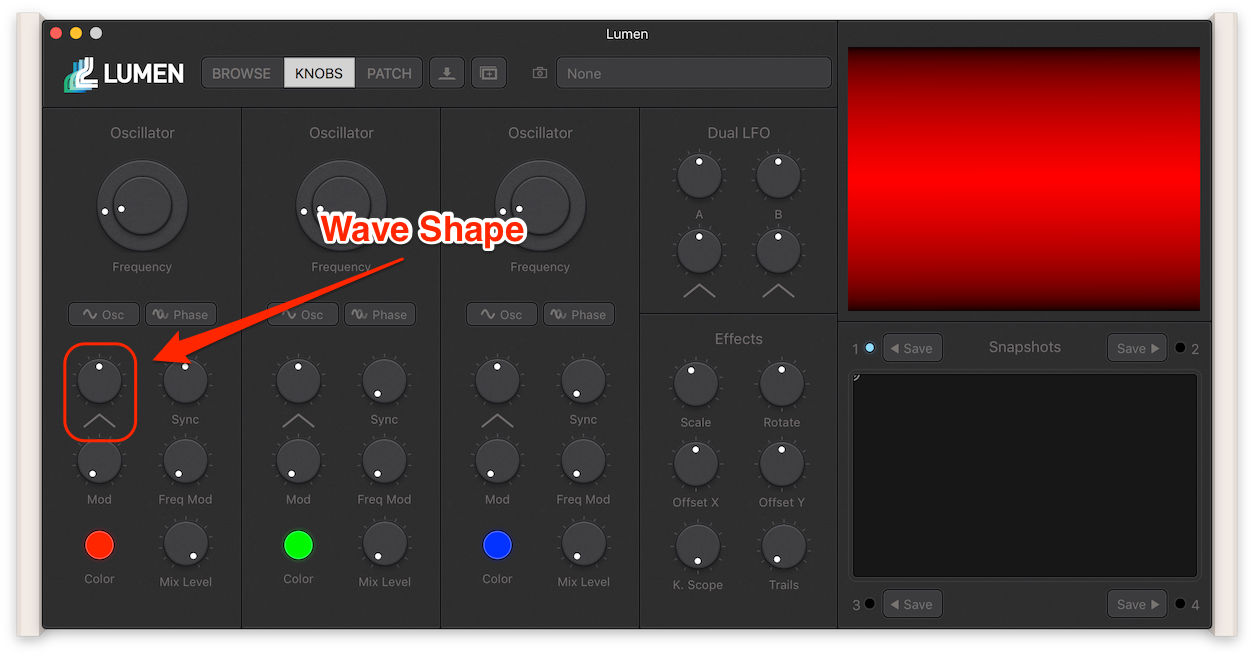
You’ll be delighted to see that the shape transitions smoothly from Saw to Triangle to Sine, each with different effects on video patterns. If you’re itching to see how to make Square Waves too, check out the Modulation guide.
_-^-_-^-_-^
Colorizer
Finally, if you’d like to adjust the color that the an Oscillator outputs, click and drag on that Oscillator’s Colorizer picker:
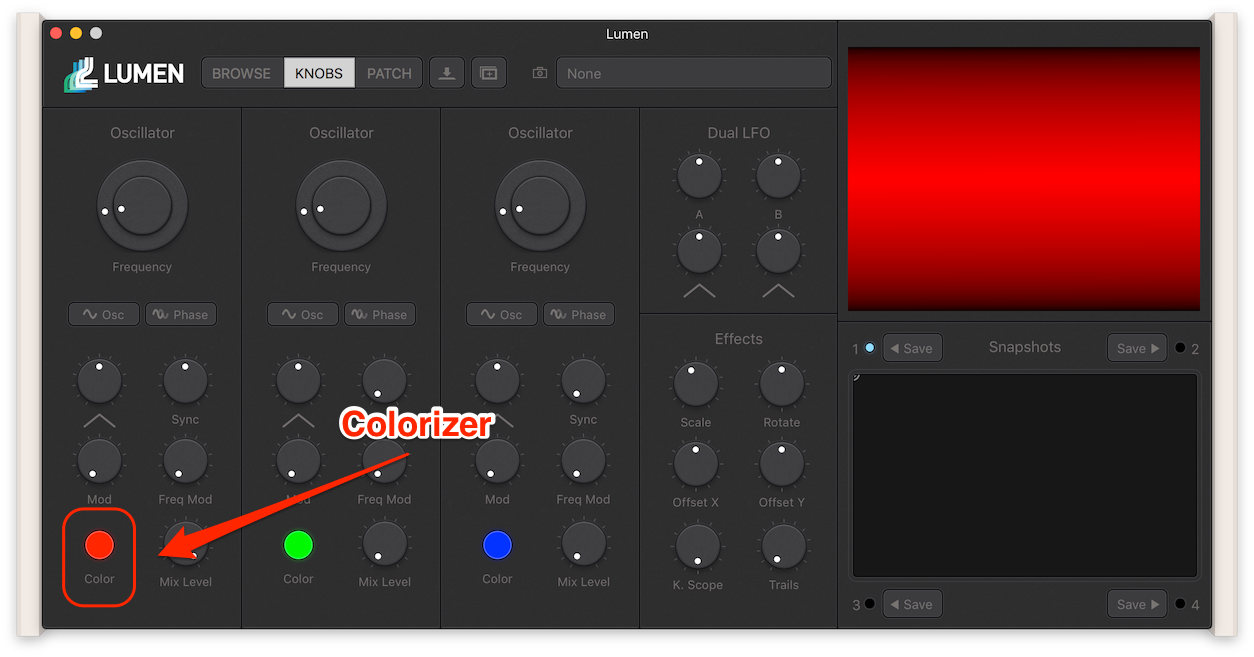
The Colorizer can adjust the Hue and Saturation of a color, and the Mix Level Knob right next to it can adjust how bright the Oscillator’s output appears in the mix.
Pro Tip Just like most interface elements in Lumen, you can double-click the Colorizer to reset it to its default value.
Well Done
This concludes the Oscillator guide - we hope you enjoyed it! To unlock the rest of the power of Lumen’s Oscillators, dive into the Modulation guide next.


